How to configure NFS Version 4 (NFS4) on Ubuntu Server
NOTE: This guide has been tested on Lucid Lynx 10.04 & Karmic Koala 9.10 although it may work equally well on earlier or later version of Ubuntu.
NFS – What is it?
NFS stands for Network File System and is a mechanism to allow machines to mount disk partitions (e.g. files, folders even whole drives) on remote machines and they will act as tho they were local disk partitions. In many ways NFS is similar to samba and if all you’re looking to do is share your Linux partitions with any windows machines on your network then it’s probably better to stick with using samba rather than using NFS. Samba is easier to set up (although neither are particularly difficult to set up) and is more secure. However, the transfer speeds you’ll get between the two machines are typically greater when using NFS than they are using samba.
There are two parts to an NFS configuration or installation: The server and the client. The machine which will be hosting the files/folders (ie. the machine where the files and folders physically reside) is called the server and the machine which needs access to those files is called the client.
Installing and configuring NFS Server
If you’re administering your Ubuntu machine using the command line then type the following two commands either from within a Putty Session or by typing the two commands directly onto the command line of your server:
sudo apt update
and type your Ubuntu password if prompted. Next type:
sudo apt install nfs-kernel-server
If you’re administering your Ubuntu machine via a gnome desktop then go into the Synaptic Package Manager (using the menus System -> Administration) and then type nfs-kernel-server in the Quick Search box and then place a check against nfs-kernel-server in the list of results returned and click Mark For Installation. Then click the Apply button and the package will be installed.
And that’s the installation part complete. Now we need to configure NFS to share the appropriate folders/files. With NFS “sharing” is called exporting or exports.
How to configure NFS server
If you’ve been following this guide right from the start then you’ll know I’m a huge fan of Webmin and this is what we’ll be using to configure the Server side of NFS. If you don’t want to use Webmin then see the section below for how to edit the required config files directly.
To make this guide easier to follow we’ll assume I’d like to export, or share, my home folder called /home/htkh.
NOTE: To keep things simple we’ll not implement any type of security or authentication and will give anyone on my network full control over my home folder (/home/htkh). Once you’ve got it working nicely you can then make it as secure and locked down as you like. The reason for adopting this approach is that some people find configuring NFS problematic so I prefer to get it working, albeit in an unsecure way, before I try and lock things down. If you try to do it all at once and find the clients cannot connect then you’ll not know whether it’s a security problem or some other problem you’ve introduced along the way.
So, first off we need to get Webmin to recognise that we’ve just installed the NFS Server package. So, in the left-hand pane within Webmin click Refresh Modules. Once the modules have been refreshed click on NFS Exports which can be found within the Networking section. Next click the Add a new export option which will open a new screen.
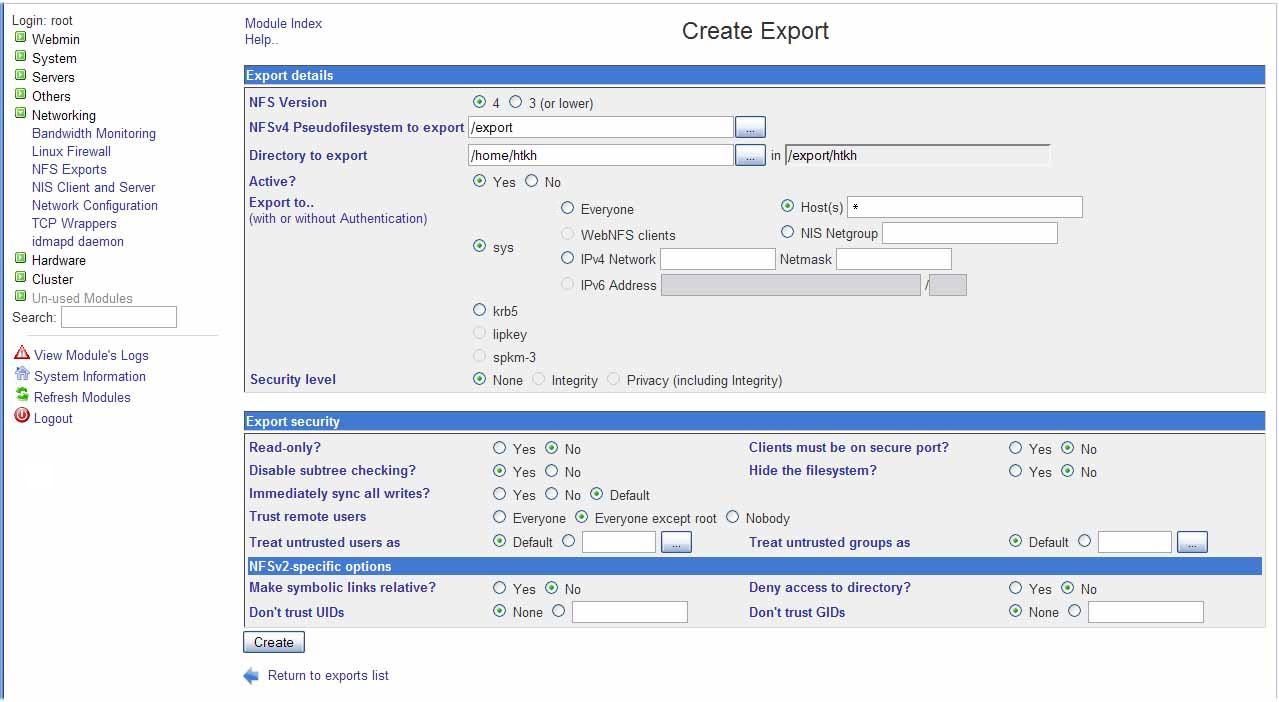
So, once you’re in the new screen, the Create Export screen, ensure the NFS Version option is set to 4 and leave the NFSv4 Pseudofilesystem to export option as it is.
Next click on the button next to the Directory to export field and navigate to /home/htkh by double-clicking on the home folder icon first and then double-clicking on the htkh folder icon and then click OK.
In the Export to.. section place a check against the Host(s) option and enter an * in the field next to it.
In the Export security section of the screen leave all options as they are except the following:
Change the Read only? option to No.
Change the Disable subtree checking? option to Yes.
Change the Clients must be on secure port? option to No.
and lastly change the Hide the filesystem? option to No.
So, your Webmin screen should look similar to this:
Then click the Create button. This will create the export and return you to the previous screen.
You can repeat the above process for each folder you want to make available to the rest of your network. Once you have finished setting them up don’t forget to click the Apply Changes button on the main NFS Exports screen to make the exports available to all the clients on your network.
Editing the config files directly
If you prefer to edit the config files directly rather than using Webmin then you’ll need to execute the following commands to achieve the above. So, from a Putty Session or Terminal (Applications -> Accessories -> Terminal) type the following commands. You could of course do this directly from the command line on your server:
First off we need to create the required “exports” folder. So,
sudo mkdir -p /export/htkh
Next we need to add the relevant entry to the /etc/fstab file to ensure the export gets mounted on boot:
sudo vim /etc/fstab
Scroll down to the bottom of the file, press the [Insert] key once (to go into “edit” mode) and then create a new blank line and enter the following text:
/home/htkh /export/htkh bind bind 0
Obviously replace the /home/htkh with the name of the actual folder you’re exporting and the /export/htkh with your particular export location.
Once you’ve done that press the [Esc] key once and type the following:
:wq
This should save your changes and bring you back to the command line. Your export should now be mounted each time you reboot the server. If you make a mistake editing the file then issue :q! instead of :wq to abort your changes.
Next we need to edit the /etc/exports file. So,
sudo vim /etc/exports
and add the following two lines to it:
/export (insecure,no_subtree_check,rw,nohide,fsid=0)
/export/htkh (insecure,no_subtree_check,rw,nohide)
obviously replacing /export with your particular export location and /export/htkh with the actual folder you’re exporting. As above, press the [Esc] key once and type the following to save and quit:
:wq
To publish the exports (ie. make them visible on your network) then issue the following command or simply reboot your machine:
sudo /etc/init.d/nfs-kernel-server restart
How to install and configure the NFS Client
So, now we’ve exported the share(s) via NFS the next step is to configure the clients. If your clients already have an NFS client installed on them then you can obviously skip this section. Some media streamers, for example the EVA9150 and Popcorn Hour, are already “NFS capable” and so all we need to do is point them at the exported shares.
If you’re administering your Ubuntu machine using the command line then type the following two commands either from within a Putty Session or by typing the two commands directly onto the command line of your server:
sudo apt update
and type your Ubuntu password if prompted. Next type:
sudo apt install nfs-common
If you’re administering your Ubuntu machine via a gnome desktop then go into the Synaptic Package Manager (using the menus System -> Administration) and then type nfs-common in the Quick Search box and then place a check against nfs-common in the list of results returned and click Mark For Installation. Then click the Apply button and the package will be installed.
And that’s the client installation part complete. Now we need to configure NFS to “mount” the folders/files we’ve just shared via NFS Server.
How to configure NFS client
Before we use Webmin to configure the client we need to make a couple of tweaks to a config file. If we don’t do this then the changes we make in Webmin will not work. So, from a Putty Session or a Terminal (Applications -> Accessories -> Terminal) type the following commands. You could of course do this directly from the command line on your server:
sudo vim /etc/default/nfs-common
We need to edit the following 3 lines:
NEED_STATD=
NEED_IDMAPD=
NEED_GSSD=
So, press the [Insert] key once (to go into “edit” mode) and then change these lines as follows:
NEED_STATD=no
NEED_IDMAPD=yes
NEED_GSSD=no
Once you’ve done that press the [Esc] key once and type the following:
:wq
This should save your changes and bring you back to the command line. If you make a mistake editing the file then issue :q! instead of :wq to abort your changes.
You should now reboot the machine to make those changes active:
sudo reboot -h now
Once the machine has rebooted we can now configure the NFS Client using Webmin. As above if you don’t want to use Webmin then see the section below for how to edit the config files directly.
So, in Webmin the first thing we need to do is to get Webmin to recognise that we’ve just installed the NFS Client package. So, in the left-hand pane within Webmin click Refresh Modules. Once the modules have been refreshed click on Disk and Network Filesystems which can be found within the System section.
What we want to do is “mount” the exported folders. So, from the Mount Type drop-down select Network Filesystem v4 (nfs4) and click the Add mount button.
Personally I mount all my exports in a folder called “nfs”. So, in the Mounted As option type /nfs
Click on the button next to the NFS Hostname and it should bring up the machine running NFS Server (ie. the one we’ve just configured above) so select that by clicking on the IP Address for that machine.
Leave all other options as they are and click the Create button. This should now mount the exported folders and they should be available to your client machine just as tho they were locally mounted folders.
Editing the config files directly
If you prefer to edit the config files directly rather than using Webmin then you’ll need to execute the following commands. So, from a Putty Session or Terminal (Applications -> Accessories -> Terminal) type the following commands. You could of course do this directly from the command line on your server:
First off we need to create the required mount points. So,
sudo mkdir -p /nfs/htkh
This will create a mount point called /nfs/htkh which you’d obviously change to suit your own needs.
Next we need to add the relevant entry to the /etc/fstab file to ensure the export gets mounted on boot:
sudo vim /etc/fstab
Scroll down to the bottom of the file, press the [Insert] key once (to go into “edit” mode) and then create a new blank line by pressing the [enter] key and type (or paste) the following text:
Hostname.home:/ /nfs nfs4 bg 0 0
You would obviously change Hostname to the name of your host and /nfs to be your own mount point.
Once you’ve done that press the [Esc] key once and type the following:
:wq
This should save your changes and bring you back to the command line. Your export should get mounted each time you reboot the server. If you make a mistake editing the file then issue :q! instead of :wq to abort your changes.
Reboot the server and you’re done!